Are you tired of squinting through hazy, yellowed headlights that diminish your nighttime visibility? You’re not alone! Over time, the sun’s UV rays and environmental pollutants can wreak havoc on your car’s once-vibrant headlights, leaving them dull and ineffective. But don’t let faded headlights dim your spirits—or put you at risk on the road! In this step-by-step guide, we’ll unveil simple yet effective techniques to bring those headlights back to life, restoring clarity and enhancing safety. Whether you’re a DIY enthusiast or just looking for an afternoon project to enhance your ride’s aesthetics, you’ll find everything you need right here. Get ready to illuminate the road ahead with confidence—let’s dive in!
Introduction to the Problem: Faded Headlights
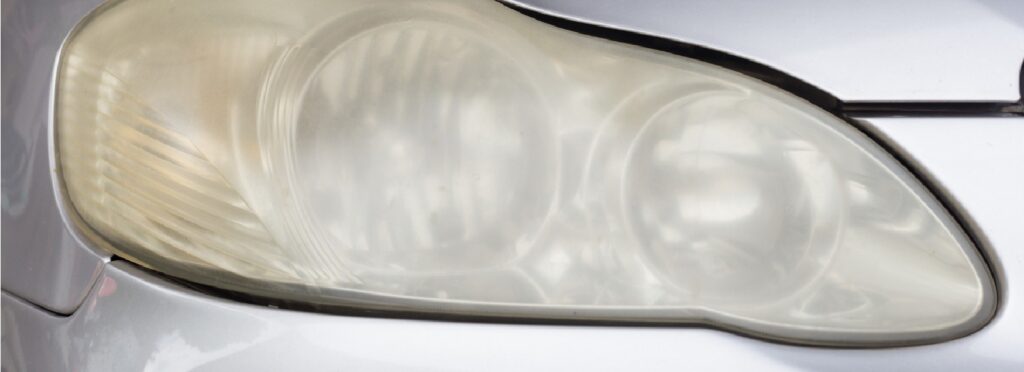
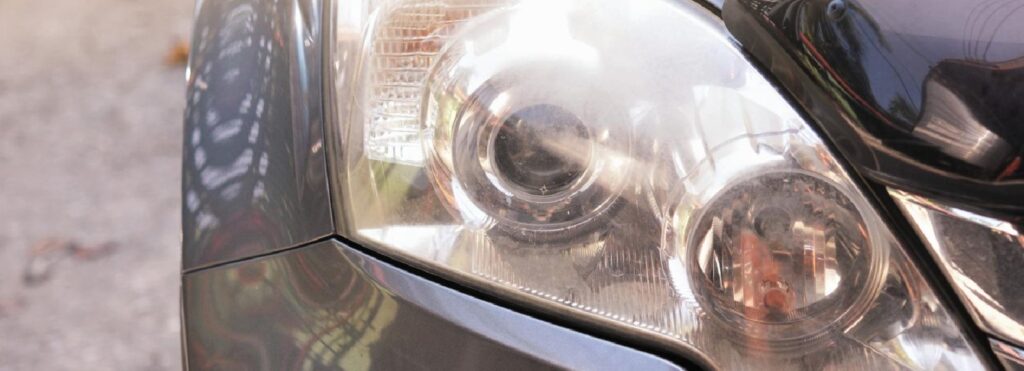
Have you ever noticed how Faded Headlights can transform your car’s appearance from sleek and polished to dull and neglected? If you’ve been driving around with foggy, yellowed lenses, you’re not alone. Many vehicle owners overlook this common issue until it’s too late. Faded Headlights not only diminish the beauty of your ride but can also significantly impact your safety on the road.
Poor visibility during nighttime drives or adverse weather conditions is a serious concern. Luckily, restoring those cloudy lights to their former glory isn’t as daunting as it seems. With just a few tools and some elbow grease, you can bring back the clarity and shine that will make your headlights look like new again! Ready to dive into the world of headlight restoration? Let’s explore what causes fading in the first place and how you can tackle this problem head-on.

Causes of Fading Headlights
Faded Headlights can be a frustrating issue for many drivers. Understanding the causes of this problem is key to addressing it effectively. One primary factor is UV exposure. The sun’s rays can break down the plastic over time, leading to that cloudy appearance we often see.
Another culprit is environmental elements like dirt, grime, and road debris. These contaminants build up on the surface and contribute to discoloration. Additionally, harsh weather conditions play their part. Rain, snow, and extreme temperatures accelerate wear and tear on headlight materials.
Chemical exposure from car washes or cleaning products can also lead to fading if not formulated specifically for automotive use. Lastly, age matters; as vehicles get older, so do their components – including headlights. Regular maintenance helps mitigate these issues before they become severe.
Why is it Important to Restore Faded Headlights?
Restoring Faded Headlights is crucial for several reasons. First and foremost, visibility plays a key role in driving safety. Dull and cloudy lenses can severely reduce the amount of light emitted from your headlights, making nighttime or inclement weather driving hazardous. Moreover, Faded Headlights negatively impact your vehicle’s appearance. They make your car look older than it is and can even decrease its resale value. A sleek, well-maintained exterior speaks volumes about how you care for your vehicle.
Additionally, neglecting to restore these lights may lead to further damage over time. Oxidation can worsen if not addressed promptly, resulting in more expensive repairs down the line. Keeping headlights clear ensures they perform optimally while enhancing overall road safety for everyone on the street.
Tools and Materials Needed for Restoration
To restore Faded Headlights effectively, gathering the right tools and materials is essential. Start with a good quality headlight restoration kit, which usually includes sandpaper of various grits. You’ll also need microfiber towels for cleaning and polishing. These help prevent scratches while ensuring a smooth finish on your headlights.
A spray bottle filled with water can be handy for wet sanding. This keeps dust down and helps achieve better results. Don’t forget to pick up a UV sealant or coating specifically designed for headlights. This protects them from future fading by creating a barrier against harmful UV rays.
Lastly, basic safety gear like gloves and goggles will keep you protected throughout the process. Having these items on hand makes your restoration project smoother and more efficient.
Step-by-Step Guide to Restoring Faded Headlights
Start by properly cleaning the headlights. Use soap and water to remove dirt and grime. A microfiber cloth will work wonders here. Next, move on to the sanding process. Grab some wet/dry sandpaper; begin with a finer grit like 800, then progress to 1500 or 2000. Wet the surface lightly and sand in circular motions for an even finish.
After sanding, it’s time for polishing. Choose a good quality plastic polish and apply it using a clean cloth. Buff gently in circular movements until you notice clarity returning. Lastly, seal those headlights with a UV sealant spray or wipe. This step protects against future fading while enhancing that fresh shine you’ve just achieved. Make sure it’s applied evenly across the surface for optimal results!
Proper Cleaning Techniques
Before diving into restoration, it’s crucial to start with a clean surface. Dust and grime can hinder the effectiveness of your restoration efforts. Begin by rinsing off any loose debris with water. This simple step will prevent scratching during the cleaning process.
Next, use a mild soap solution and a soft sponge or cloth. Avoid abrasive materials that could cause further damage. Gently scrub in circular motions to lift dirt without harming the lens. For tougher stains or oxidation, consider using a specialized headlight cleaner available at auto supply stores. Apply it according to the manufacturer’s instructions for optimal results.
After cleaning, rinse thoroughly with water to remove any soap residue. Dry the headlights completely with a microfiber towel before proceeding to sanding or polishing steps. Proper preparation sets the stage for successful restoration of Faded Headlights.
Sanding Process
The sanding process is a crucial step in restoring Faded Headlights. Start with wet sanding to minimize scratches and heat buildup. This technique helps keep the surface cool, ensuring an even finish. Begin with 800-grit sandpaper. Lightly sand the entire headlight, using circular motions for uniformity. Don’t apply too much pressure; let the sandpaper do the work.
After achieving a dull appearance on the lens, switch to finer grit paper, like 1200 or 2000-grit. This will refine your work and smooth out any imperfections left from previous sanding. Keep rinsing your headlight with water frequently while you work to wash away debris and ensure clarity as you progress through grits.
This method not only prepares your headlights for polishing but also removes oxidation effectively, setting up a strong foundation for that crystal-clear shine you’re aiming for later on in the restoration process.
Polishing process
Polishing is a crucial step in restoring Faded Headlights. It brings back clarity and shine, making them look almost new again. Start by selecting a quality polishing compound designed for plastics. Apply a small amount to the headlight surface using an applicator pad or microfiber cloth. Work it into the lens with gentle, circular motions.
Be patient during this process. Spend several minutes on each headlight to ensure even coverage and maximum effect. Keep checking your progress; you want that crystal-clear finish. After polishing, use a clean cloth to wipe away any residue left behind. This not only enhances visibility but also protects against further damage from UV rays and environmental factors.
With careful attention, you’ll notice how much brighter your lights appear, improving both aesthetics and safety on the road ahead.
Sealing the Headlights
Sealing your headlights is a crucial step that protects them from future damage. After polishing, the lens needs a shield against UV rays and environmental factors.
Choose a high-quality UV sealant designed specifically for automotive lights. Apply it evenly across the surface of the headlight using a foam applicator or microfiber cloth. Ensure you cover every inch to create an effective barrier.
Allow it to cure as per manufacturer instructions. This process usually takes just a few minutes but can extend the life of your restoration significantly. Don’t forget this step; skipping it can lead to quick deterioration once again. Proper sealing not only keeps your headlights looking fresh but also enhances their performance on the road, ensuring safer nighttime driving conditions for you and others.
Alternatives to DIY Restoration
If you’re not up for the DIY challenge, professional services are a great alternative. Skilled technicians use specialized tools and techniques to restore Faded Headlights efficiently. One such service is Wet Detail. They offer quality restoration that can make your headlights shine like new.
While going the professional route might seem costly upfront, it often saves time and effort. Plus, experts guarantee their work with long-lasting results. When considering costs, weigh the materials needed for a DIY project against the price of hiring professionals. Sometimes investing in a service pays off better than buying supplies that may go unused afterward.
Remember that your safety is paramount; clear visibility while driving is essential. Choosing a reliable service for Basic Detail in Garland, TX could be worth every penny for peace of mind on the road ahead.
Professional Services from Wet Detail
When considering ways to restore Faded Headlights, professional services offer a reliable alternative. Companies like Wet Detail specialize in Basic Detail in Garland, TX and can bring your headlights back to life.
Their trained technicians use advanced techniques and high-quality products that may not be available for typical DIY projects. This expertise ensures thorough restoration without risking further damage to the headlight lens. The process usually involves a multi-step cleaning procedure, precise sanding, and specialized polishing equipment designed for optimal results. You’ll often notice immediate improvements after just one visit.
One of the key advantages is saving time. Instead of spending hours on a DIY project, you can have peace of mind knowing that professionals are handling it efficiently. Plus, many services provide warranties for their work, adding extra value and assurance.
Tips for Maintaining Restored Headlights
Maintaining restored headlights is crucial for longevity and visibility. Start with regular cleaning using a gentle soap solution. Avoid abrasive materials that can scratch the surface. Consider applying UV protectant sprays specifically designed for headlights. This extra layer shields against sun damage and prevents fading over time.
Parking in shaded areas or using a car cover can also help reduce exposure to harmful UV rays. If possible, try to avoid driving during heavy rain or on gravel roads, which can cause wear. Regularly inspect your headlights for any signs of yellowing or cloudiness. Catching issues early makes future restoration easier and less costly.
Finally, remember to check the alignment of your headlights periodically. Proper alignment ensures optimal performance while driving at night, enhancing safety on the road.
Final Thoughts
Restoring Faded Headlights can significantly enhance both the appearance and safety of your vehicle. By following the steps outlined in this guide, you can bring your headlights back to life without spending a fortune. The process may seem daunting at first, but with the right tools and a little patience, it’s entirely manageable.
Maintaining those restored headlights is crucial for longevity. Regularly cleaning them and applying UV protection will help prevent future fading. If you’re ever unsure or pressed for time, consider professional services like Wet Detail. Weighing the cost of DIY versus professional restoration can help you choose what best fits your needs.
Whether you decide to take on this project yourself or hire an expert, taking action to restore Faded Headlights is essential for safe driving and enhanced visibility on the road. Enjoy clear sights ahead!